实验用机:CentOS 5.7
root用户可以更改任何用户的密码,普通用户只能修改自己的密码。
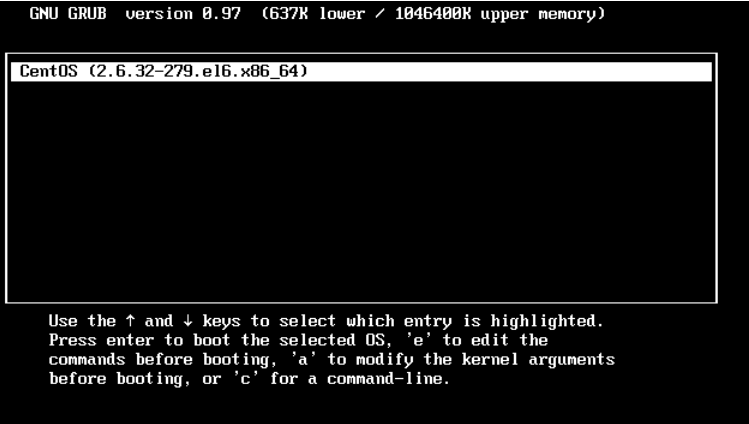
步骤:
1、重新启动系统
2、开机倒数时间内,敲任意键

3、按字母e去编辑
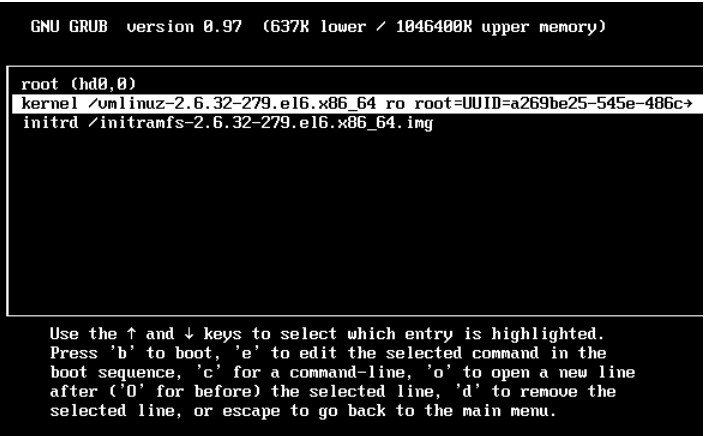
4、选择kernel 开头的行,再次按字母e 编辑
然后敲空格 输入数字1,再敲回车
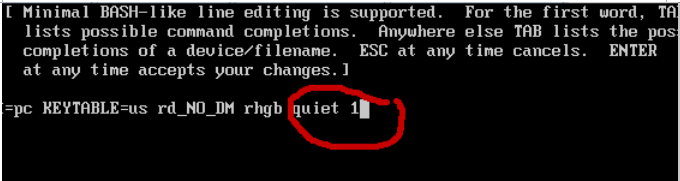
进入单用户模式,破解密码。(此模式绕过密码验证)
5、按字母键b 去引导进入系统


|
1 2 3 4 5 6 7 8 9 10 11 12 13 14 15 16 17 18 19 20 |
<span style="font-size: 16px;"><span style="color: rgba(0, 0, 0, 1);">shell</span>> vim /etc/<span style="color: rgba(0, 0, 0, 1);">inittab # Default runlevel. The runlevels used are: # </span><span style="color: rgba(128, 0, 128, 1);">0</span> - halt (Do NOT <span style="color: rgba(0, 0, 255, 1);">set</span> initdefault to <span style="color: rgba(0, 0, 255, 1);">this</span><span style="color: rgba(0, 0, 0, 1);">) # </span><span style="color: rgba(128, 0, 128, 1);">1</span> -<span style="color: rgba(0, 0, 0, 1);"> Single user mode # </span><span style="color: rgba(128, 0, 128, 1);">2</span> - Multiuser, without NFS (The same <span style="color: rgba(0, 0, 255, 1);">as</span> <span style="color: rgba(128, 0, 128, 1);">3</span>, <span style="color: rgba(0, 0, 255, 1);">if</span> you <span style="color: rgba(0, 0, 255, 1);">do</span><span style="color: rgba(0, 0, 0, 1);"> not have networking) # </span><span style="color: rgba(128, 0, 128, 1);">3</span> -<span style="color: rgba(0, 0, 0, 1);"> Full multiuser mode # </span><span style="color: rgba(128, 0, 128, 1);">4</span> -<span style="color: rgba(0, 0, 0, 1);"> unused # </span><span style="color: rgba(128, 0, 128, 1);">5</span> -<span style="color: rgba(0, 0, 0, 1);"> X11 # </span><span style="color: rgba(128, 0, 128, 1);">6</span> - reboot (Do NOT <span style="color: rgba(0, 0, 255, 1);">set</span> initdefault to <span style="color: rgba(0, 0, 255, 1);">this</span><span style="color: rgba(0, 0, 0, 1);">) id : 3 : initdefault : //设置开机启动进入字符界面 解析:(linux运行级别) </span><span style="color: rgba(128, 0, 128, 1);">0</span><span style="color: rgba(0, 0, 0, 1);"> halt 关机 </span><span style="color: rgba(128, 0, 128, 1);">1</span> 单用户模式 --<span style="color: rgba(0, 0, 0, 1);">破解密码的时候 </span><span style="color: rgba(128, 0, 128, 1);">2</span> 多用户模式 --<span style="color: rgba(0, 0, 0, 1);">不能使用NFS功能 </span><span style="color: rgba(128, 0, 128, 1);">3</span> 完全多用户模式,可以使用网络功能 --<span style="color: rgba(0, 0, 0, 1);">字符界面 </span><span style="color: rgba(128, 0, 128, 1);">4</span><span style="color: rgba(0, 0, 0, 1);"> 未使用 </span><span style="color: rgba(128, 0, 128, 1);">5</span> 完全多用户模式,可以使用网络功能 --<span style="color: rgba(0, 0, 0, 1);">图形界面 </span><span style="color: rgba(128, 0, 128, 1);">6</span><span style="color: rgba(0, 0, 0, 1);"> 重新启动 initdefault 系统默认的初始化级别</span></span> |
init 0 关机 (poweroff、halt、shutdown -h now )
init 6 重新启动 (reboot、shutdown -r now)
init 3 进入字符界面
|
1 2 3 4 5 6 7 8 9 10 11 12 13 14 15 |
<span style="font-size: 16px;">shell> runlevel <span style="color: rgba(0, 128, 0, 1);">//</span><span style="color: rgba(0, 128, 0, 1);">查看当前的运行级别</span> <span style="color: rgba(128, 0, 128, 1);">1</span><span style="color: rgba(0, 0, 0, 1);"> S #</span><span style="color: rgba(128, 0, 128, 1);">1</span><span style="color: rgba(0, 0, 0, 1);"> 代表开机进入的运行级别 #S 代表当前的运行级别(single) shell</span>> init <span style="color: rgba(128, 0, 128, 1);">3</span><span style="color: rgba(0, 0, 0, 1);"> 切换用户级别 (重启 ……) shell</span>><span style="color: rgba(0, 0, 0, 1);"> runlevel S </span><span style="color: rgba(128, 0, 128, 1);">3</span><span style="color: rgba(0, 0, 0, 1);"> #说明是从单用户切换到运行级别3 shell</span>><span style="color: rgba(0, 0, 0, 1);"> runlevel N </span><span style="color: rgba(128, 0, 128, 1);">3</span><span style="color: rgba(0, 0, 0, 1);"> N 代表之前没有运行级别</span></span> |
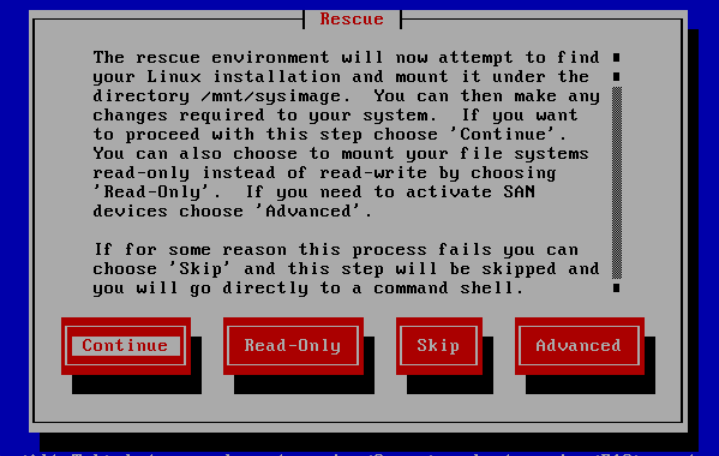
Q:如何进入营救模式(rescue mode)
A:
使用光盘进入
步骤:
1、放入系统光盘(无所谓是否对应)

2、设置从光盘启动
当进入启动页面时及时按Esc键(boot menu)

> 选择rescue installed system 进入营救模式

按提示步骤执行(选择)
> rescue method –> local cd/dvd (Centos)
> 是否连接网络–No

> 想要对系统做更改(即可以读又可以写) –> continue
只读的方式挂载 –> read-only
如果想激活SAN –> advanced
如果有错误可以跳过该步骤进入一种shell –> skip
> chroot /mnt/sysimage #切换根环境到原来本身系统里的根
> cp /etc/passwd- /etc/passwd
(或是进行其他操作进行修改,vi文件)
> exit
> reboot
总结:
1.单用户模式 –> 破解密码
看/etc/passwd
不看/etc/shadow
2.营救模式 –> 进入不了系统了
利用光盘里的系统进入电脑,去修复磁盘里的系统