前言
在上一章:React 简单教程-1-组件 我们知道了 React 的组件是什么,长什么样,用 js 和 HTML 小小体验了一下组件。在这一章,我们将使用 typescript(简称 ts) 来代替 js,这种语法的文件名后缀是 tsx。
我强烈建议使用 ts 来开发 React,要说 ts 比 js 好在哪里?这么说,js 唯一不好的地方就是它只能用 js 来写。
如果你不会 ts,那么你可以稍微地学习一下,官网:typescript,能够看懂一些基本语法就可以了,我们会在编写代码的过程中慢慢学习。
新建 React-ts 项目
现在,忘了我们在上一章创建的项目吧,我们要重新创建一个使用 ts 开发的 React 项目。创建的方式其实和我们上一章的方式相同,在终端输入命令,但有一点不一样:
|
1 2 |
npm create vite@latest my-react-app -- --template react-ts |
在最后面指定模板的参数,我们使用的是 react-ts,表示是一个 react 项目,且用 ts 开发。
进入到文件夹,应该会看到如下的目录结构:
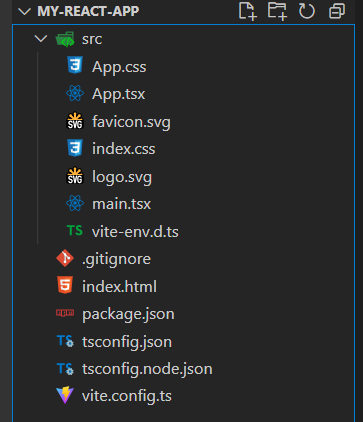
这个文件结构我们还是很熟悉的,不过我们能够注意到,在上一章中我们写代码的组件文件名从 App.jsx 变成了 App.tsx,说明使用的是 ts 语言来开发。按照上一章的步骤,执行 npm i 安装依赖包,然后执行 npm run dev 来启动开发服务器,在浏览器中打开地址 http://localhost:3000/。
你可以在 App.tsx 中随意修改你的代码。这些步骤都跟我们在上一章中相同。
参数传递
组件可以接收其他组件传递过来的参数。比如说父组件中有一个值,这个值需要传递给子组件显示,那么子组件要这么接收这个值呢?
我们先新建一个子组件吧,这个组件用于显示值,就叫 displayer.tsx 吧。
|
1 2 3 4 |
export function Displayer() { return <div></div>; } |
这个组件要可以接收传进来的参数,只需要在它的入参里写上 props 即可。
|
1 2 3 4 |
export function Displayer(props) { return <div></div>; } |
这个名字是约定的,所以不能写错。它的类型是一个对象,所有传递进来的参数都是 props 的属性。比如说,外部传递进来了一个参数叫 name,那么我们使用这个参数的写法就是:
|
1 2 3 4 5 6 |
export function Displayer(props) { // 像这样获取,因为所有的传递给组件的参数都是 props 的属性 const name = props.name; return <div></div>; } |
然后,我们把这个参数的值,在返回的 html 里使用,要用花括号括起来,表示使用这个变量,不然会被识别为字面量:
|
1 2 3 4 5 6 7 8 9 10 11 |
export function Displayer(props) { const name = props.name; return ( <div> <div>可以这么使用变量:{name}</div> <div>也可以直接使用:{props.name}</div> <div>没有花括号则被当作是字面量:props.name</div> </div> ); } |
然后,如同我们上一章学的,在父组件中使用子组件,这里我们的父组件是 App。
|
1 2 3 4 5 6 7 8 9 10 11 |
import { Displayer } from "./displayer"; function App() { return ( <div> {/*使用子组件*/} <Displayer /> </div> ); } |
我们还没有在父组件里给子组件传递参数,传递参数的方式也非常简单,就跟 html 的属性一样,直接写上子组件的参数名:
|
1 2 3 4 5 6 7 8 9 10 11 |
import { Displayer } from "./displayer"; function App() { return ( <div> {/*使用子组件,传递参数*/} <Displayer name="My name is App" /> </div> ); } |
注意传递参数是直接写参数名,不需要写 props,在子组件里使用时才需要写 props。
我们启动看看效果,如下:

可以看到父组件的参数成功传递到了子组件并显示。
如果传递更多的参数的话也是一样的写法,我在下方做示例,同时给我们的 props 参数添加上类型,以方便的知道子组件能够传递什么参数,这也是使用 ts 的便捷之处。
|
1 2 3 4 5 6 7 8 9 10 11 12 13 14 15 16 17 18 19 20 21 22 23 |
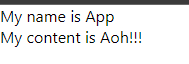
// 子组件 export function Displayer(props: { name: string, content: string }) { const name = props.name; const content = props.content; return ( <div> <div>{name}</div> <div>{content}</div> </div> ); } // 父组件 import { Displayer } from "./displayer"; function App() { return ( <div> <Displayer name="My name is App" content="My content is Aoh!!!" /> </div> ); } |
效果如下:
当然,我们可以随意得把玩子组件,学习的方式之一就是用各种方式来把玩,我们可以在父组件中多用几次子组件:
|
1 2 3 4 5 6 7 8 9 10 11 12 13 14 |
// 父组件 import { Displayer } from "./displayer"; function App() { return ( <div> <Displayer name="My name is App1" content="My content is Aoh!!!1" /> <Displayer name="My name is App2" content="My content is Aoh!!!2" /> <Displayer name="My name is App3" content="My content is Aoh!!!3" /> <Displayer name="My name is App4" content="My content is Aoh!!!4" /> </div> ); } |
那么你就能看到如下效果:

警告
如果这么写会怎么样???
|
1 2 3 4 5 6 7 8 9 10 11 12 13 14 15 |
// 在组件中引用它自己 // 不要这么写 export function Displayer(props: { name: string, content: string }) { const name = props.name; const content = props.content; return ( <div> <div>{name}</div> <div>{content}</div> {/* 会发生什么事??? */} <Displayer name="My name is Sub1" content="My content is Error!!!1" /> </div> ); } |
总结
在本文中,我们学会了组件如何传递参数。但是我们的子组件还没有任何样式,下一篇中我们将给它加上样式,让它看起来好看一些。
参考资料
组件 & Props by React