前言
在上一章 React 简单教程-2-ts 和组件参数 中我们新建的子组件 Displayer 没有样式,显得平平无奇,这一篇我们将给他美化一下。
CSS 文件
一般的做法,是在你的组件级目录下新建一个和组件同名的 CSS 文件。如,我们的组件是 displayer.tsx,我们就在同级目录下新建一个 displayer.css,然后在组件 Displayer 中直接引入这个文件:
|
1 2 3 4 5 6 7 8 9 10 11 12 |
// 引入 import "./displayer.css"; export function Displayer(props: { name: string, content: string }) { // ... return ( <div> {/* ... */} </div> ); } |
我们先写下一个样式,该样式将背景变成灰色:
|
1 2 3 4 |
.gray { background-color: gray; } |
然后在组件中使用样式:
|
1 2 3 4 5 6 7 8 9 10 11 12 13 14 15 16 |
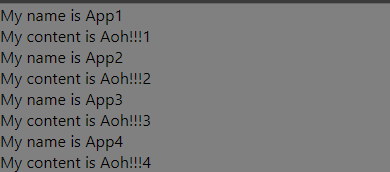
// 引入 import "./displayer.css"; export function Displayer(props: { name: string, content: string }) { const name = props.name; const content = props.content; return ( // className,不是 class <div className="gray"> <div>{name}</div> <div>{content}</div> <Displayer name="My name is App1" content="My content is Aoh!!!1" /> </div> ); } |
注意在 react 中使用的是 className,而不是和 html 一样使用 class,这两者写法不同而已,功能完全一样。注意小驼峰写法。
启动后界面的效果如下:
你看起效了,我们能够用我们熟悉的方式来编写 CSS 样式。
我们简单美化一下,将子组件的样式做得好看一点:
CSS 代码:
|
1 2 3 4 5 6 7 8 9 10 11 12 13 14 15 16 17 18 19 20 21 22 23 24 25 26 27 28 29 30 31 32 33 34 35 36 37 38 39 |
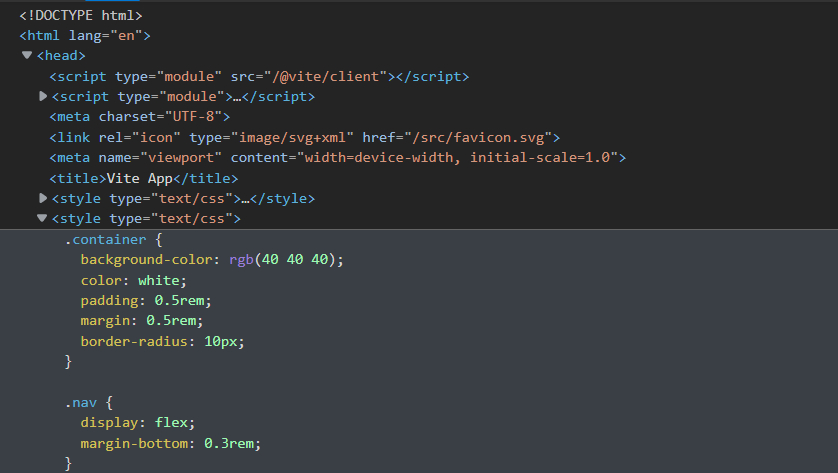
.container { background-color: rgb(40 40 40); color: white; padding: 0.5rem; margin: 0.5rem; border-radius: 10px; } .nav { display: flex; margin-bottom: 0.3rem; } .btn-red { height: 12px; width: 12px; background-color: rgb(255, 29, 29); border-radius: 15px; } .btn-yellow { height: 12px; width: 12px; background-color: rgb(255, 251, 29); border-radius: 15px; margin: auto 0.5rem; } .btn-gray { height: 12px; width: 12px; background-color: rgb(220, 220, 220); border-radius: 15px; } .body { padding: 0.5rem 0; } |
组件代码
|
1 2 3 4 5 6 7 8 9 10 11 12 13 14 15 16 17 18 19 20 |
import "./displayer.css"; export function Displayer(props: { name: string, content: string }) { const name = props.name; const content = props.content; return ( <div className="container"> <div className="nav"> <span className="btn-red"></span> <span className="btn-yellow"></span> <span className="btn-gray"></span> </div> <div className="body"> <div>{name}</div> <div>{content}</div> </div> </div> ); } |
界面效果如下:
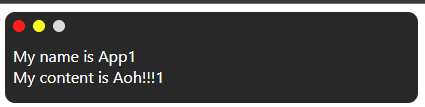
稍微好看一点了。以后我们便可以在任何想要的地方使用这个子组件了,而不用跟以前写原生 HTML 一样,每个地方都重新写一遍。
CSS 组件样式缺陷
如果我们在开发者工具(F12)中查看页面的 html 代码,我们可以发现我们的样式是直接在 head 的 style 标签中。
就连其他组件的样式也是在 head 的 style 标签中。这就意味着在不同的组件样式文件中,如果出现了相同的 CSS 类名,那么样式就会被覆盖掉。你可以在 App 组件样式中定义一个 CSS 类,再到 Displayer 的组件样式中定义一个相同名字不同属性值的 CSS 类,你会发现 App 组件的样式就失效了。
在组件里使用样式,最好的情况当然是这个组件的样式不会被其他因素所影响。对于这种情况,一种办法是给组件样式起一个独一无二的名字,比如样式上加上组件名:
|
1 2 3 4 5 |
/* 加上组件名 displayer */ .displayer-container { /* ... */ } |
这种方式写起来既难受又繁琐,我推荐的另外一种方式是使用功能类优先的写法。在我一篇文章 为什么我在 css 里使用功能类优先 有描述到这种写法,使用到的库是 tailwindcss。
总结
本文我们学了怎么在 react 组件编写 CSS 样式并引用,也探讨了直接使用 CSS 文件的弊端。